We have seen how to modify dynamically and apply effects on textures in previous tutorials, but sometimes we need to create this texture dynamically too. One nice example of this is a drawing canvas.
Part 1: Drawing canvas
Part 2: Adding decals
C++ section
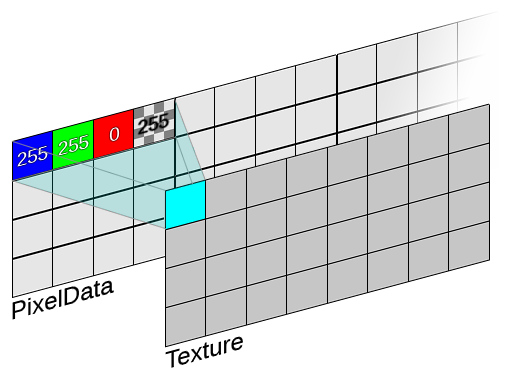
Our first task is to write a class to store the dynamic texture and update it. We need to store the value for each color channel and the alpha channel too. So each pixel can be represented using 4 cells of our data structure. We must take this into account during the iteration of the canvas pixel data structure.
DrawingCanvas.h
#pragma once

#include <memory>
#include "Engine/Texture2D.h"
#include "Object.h"
#include "DrawingCanvas.generated.h"

UCLASS(Blueprintable, BlueprintType)
class TUTORIAL_CANVAS_API UDrawingCanvas : public UObject
{
	GENERATED_BODY()

public:

	UPROPERTY(EditAnywhere, BlueprintReadWrite, Category = Variables)
		UTexture2D* dynamicCanvas;

	UFUNCTION(BlueprintCallable, Category = DrawingTools)
		void InitializeCanvas(const int32 pixelsH, const int32 pixelsV);
	UFUNCTION(BlueprintCallable, Category = DrawingTools)
		void UpdateCanvas();
	UFUNCTION(BlueprintCallable, Category = DrawingTools)
		void ClearCanvas();

	UDrawingCanvas();
	~UDrawingCanvas();

private:

	// canvas
	std::unique_ptr<uint8[]> canvasPixelData;
	int canvasWidth;
	int canvasHeight;
	int bytesPerPixel;
	int bufferPitch;
	int bufferSize;

	std::unique_ptr<FUpdateTextureRegion2D> echoUpdateTextureRegion;
	void setPixelColor(uint8*& pointer, uint8 red, uint8 green, uint8 blue, uint8 alpha);
};
DrawingCanvas.cpp
To initialize our canvas we need to create the dynamic texture (Texture2D ) using a CreateTransient call and reserve the space of the buffer to store the data of each pixel.
void UDrawingCanvas::InitializeCanvas(const int32 pixelsH, const int32 pixelsV)
{
	//dynamic texture initialization
	canvasWidth = pixelsH;
	canvasHeight = pixelsV;

	dynamicCanvas = UTexture2D::CreateTransient(canvasWidth, canvasHeight);
#if WITH_EDITORONLY_DATA
	dynamicCanvas->MipGenSettings = TextureMipGenSettings::TMGS_NoMipmaps;
#endif
	dynamicCanvas->CompressionSettings = TextureCompressionSettings::TC_VectorDisplacementmap;
	dynamicCanvas->SRGB = 1;
	dynamicCanvas->AddToRoot();
	dynamicCanvas->Filter = TextureFilter::TF_Nearest;
	dynamicCanvas->UpdateResource();

	echoUpdateTextureRegion = std::unique_ptr<FUpdateTextureRegion2D>(new FUpdateTextureRegion2D(0, 0, 0, 0, canvasWidth, canvasHeight));


	// buffers initialization
	bytesPerPixel = 4; // r g b a
	bufferPitch = canvasWidth * bytesPerPixel;
	bufferSize = canvasWidth * canvasHeight * bytesPerPixel;
	canvasPixelData = std::unique_ptr<uint8[]>(new uint8[bufferSize]);

	ClearCanvas();
}
A function to set the value of all channels for one pixel using one call. Note that the order of the data inside of the structure is different than the typical RGBA order
void UDrawingCanvas::setPixelColor(uint8*& pointer, uint8 red, uint8 green, uint8 blue, uint8 alpha)
{
	*pointer = blue; //b
	*(pointer + 1) = green; //g
	*(pointer + 2) = red; //r
	*(pointer + 3) = alpha; //a
}
We need to move the Pointer of the pixel data to the next pixel data instead of the next cell in each iteration, so we must to increase the canvas pixel pointer by 4. For example the function to clear the canvas could look like this:
void UDrawingCanvas::ClearCanvas()
{
	uint8* canvasPixelPtr = canvasPixelData.get();
	for (int i = 0; i < canvasWidth * canvasHeight; ++i)
	{
		setPixelColor(canvasPixelPtr, 255, 255, 255, 255); //white
		canvasPixelPtr += bytesPerPixel;
	}
	UpdateCanvas();
}
To update our texture we can use a call to UpdateTextureRegions. One of the input parameters to this function is our pixel data structure. So that whenever we modified the pixel data structure we need to call this function to make the change visible in the texture.
void UDrawingCanvas::UpdateCanvas()
{
	if (echoUpdateTextureRegion)
	{
		dynamicCanvas->UpdateTextureRegions((int32)0, (uint32)1, echoUpdateTextureRegion.get(), (uint32)bufferPitch, (uint32)bytesPerPixel, canvasPixelData.get());
	}
}
The brush tool
Also we can add a basic tool to draw on the canvas, a function to initialize the brush settings, their brush mask, and a call to paint using this brush into the canvas centered on the input coordinates of the touch event.
DrawingCanvas.h
	UFUNCTION(BlueprintCallable, Category = DrawingTools)
		void InitializeDrawingTools(const int32 brushRadius);
	UFUNCTION(BlueprintCallable, Category = DrawingTools)
		void DrawDot(const int32 pixelCoordX, const int32 pixelCoordY);
private:
	// draw brush tool
	std::unique_ptr<uint8[]> canvasBrushMask;
	int radius;
	int brushBufferSize;
DrawingCanvas.cpp
The buffer of the brush has the same structure than the canvas buffer. We will use 4 cells for each pixel. For this example we will use a black brush pixel so we will set a RGB value of 000 and a value of 255 for the alpha. Outside the dot we only need to set the value of the alpha channel to 0.
void UDrawingCanvas::InitializeDrawingTools(const int32 brushRadius)
{
	radius = brushRadius;
	brushBufferSize = radius * radius * 4 * bytesPerPixel; //2r*2r * bpp
	canvasBrushMask = std::unique_ptr<uint8[]>(new uint8[brushBufferSize]);
	uint8* canvasBrushPixelPtr = canvasBrushMask.get();
	for (int px = -radius; px < radius; ++px)
	{
		for (int py = -radius; py < radius; ++py)
		{
			int32 tx = px + radius;
			int32 ty = py + radius;
			canvasBrushPixelPtr = canvasBrushMask.get() + (tx +  + ty * 2 * radius) * bytesPerPixel;
			if (px*px + py*py < radius*radius)
			{
				setPixelColor(canvasBrushPixelPtr, 0, 0, 0, 255); //black alpha 255 - bgra
			}
			else
			{
				setPixelColor(canvasBrushPixelPtr, 0, 0, 0, 0); // alpha 0
			}
		}
	}
}
To draw a dot we will center the brush mask and apply the dot mask, checking the alpha value we can know if we need to paint or not the canvas pixels. Every time that the canvas is modified we need to call to the UpdateCanvas() function to update the dynamic texture.
void UDrawingCanvas::DrawDot(const int32 pixelCoordX, const int32 pixelCoordY)
{
	uint8* canvasPixelPtr = canvasPixelData.get();
	const uint8* canvasBrushPixelPtr = canvasBrushMask.get();
	for (int px = -radius; px < radius; ++px)
	{
		for (int py = -radius; py < radius; ++py)
		{
			int32 tbx = px + radius;
			int32 tby = py + radius;
			canvasBrushPixelPtr = canvasBrushMask.get() + (tbx + tby * 2* radius) * bytesPerPixel;
			if (*(canvasBrushPixelPtr + 3) == 255) // check the alpha value of the pixel of the brush mask
			{
				int32 tx = pixelCoordX + px;
				int32 ty = pixelCoordY + py;
				if (tx >= 0 && tx < canvasWidth && ty >= 0 && ty < canvasHeight)
				{
					canvasPixelPtr = canvasPixelData.get() + (tx + ty * canvasWidth) * bytesPerPixel;
					setPixelColor(canvasPixelPtr, *(canvasBrushPixelPtr + 2), *(canvasBrushPixelPtr + 1), *(canvasBrushPixelPtr), *(canvasBrushPixelPtr + 3));
				}
			}
		}
	}

	UpdateCanvas();
}
Blueprint section
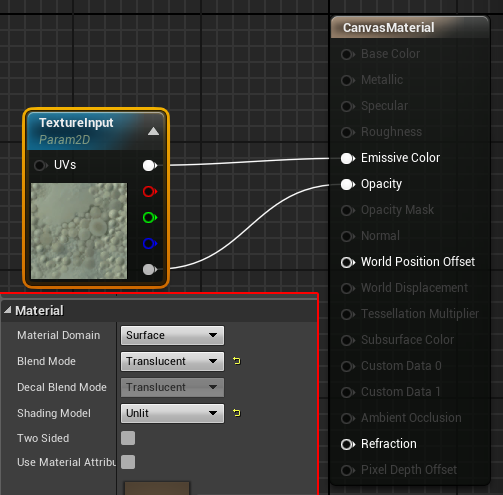
To be able to use our dynamic texture we need to create a material with an input parameter node of type TextureSampleParameter2D.
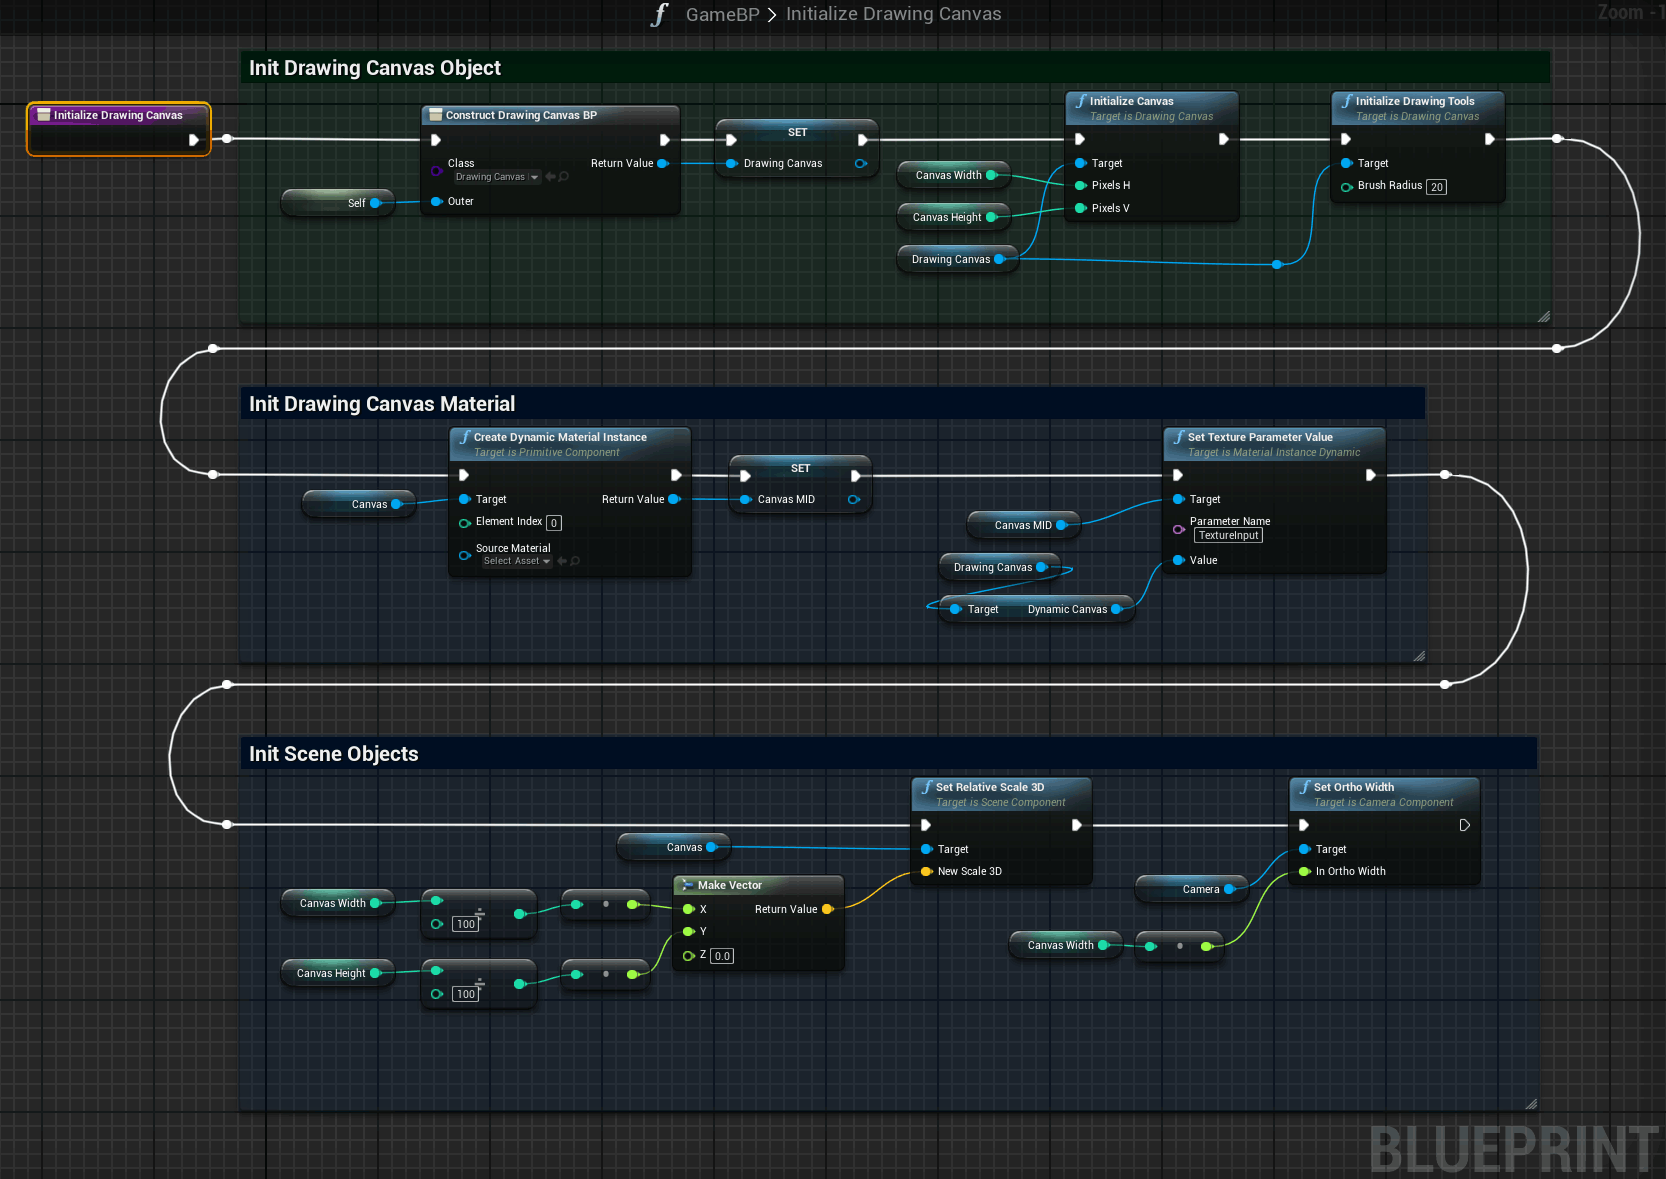
In the canvas initialization we are going to pass the dynamic texture of our drawing canvas class as input parameter of this material using the SetTextureParameterValue node
Now we can create a Blueprint of this class to be able to use this drawing class in our project.
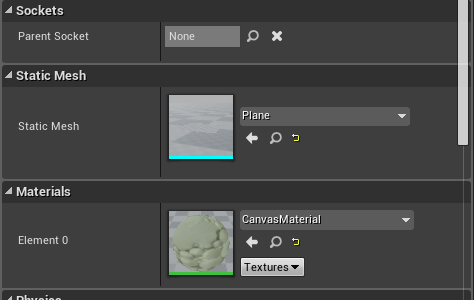
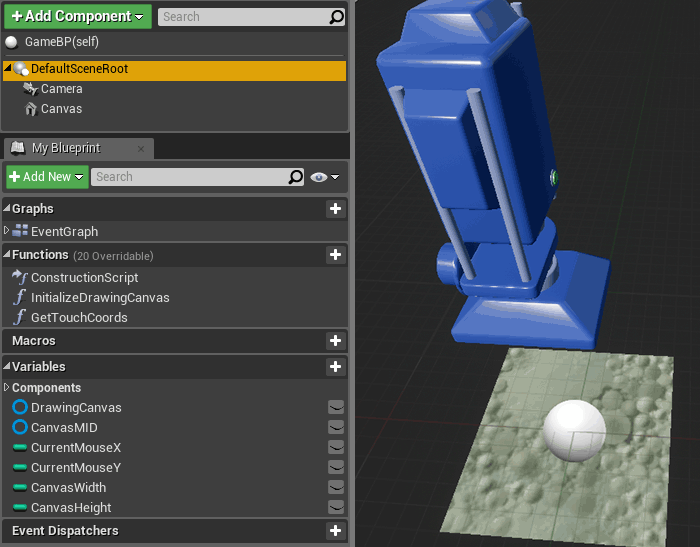
We are going to add our drawing canvas to an Actor. This actor has a Camera focused in a Plane Mesh, the material of this mesh has been replaced with our canvas material.
We will store the canvas dimensions, the drawing canvas object, a Material Instance dynamic of the Plane Mesh and the mouse position, to draw only if the mouse pixel change while dragging.
Take a look to this function to initialize the main components:
We can start with the DrawingCanvas object, using the Construct Object from Class node to create the variable and calling after that to the class member function to set the canvas dimensions and the brush radius.
The next step is to initialize the instance that will contain the dynamic texture.
The final initialization step is to set the dimensions of the plane and set the camera parameters according to the plane dimension.
A plane has a dimension of 100 x 100 pixels so if we want a canvas of 1000 x 1000 pixels with a ratio 1:1 (1 pixel of plane : 1 pixel of canvas) we need to scale it by 1000 / 100 = 10.
A camera with a Projection Mode Orthographic and a Ortho width equals to the plane width will fill the screen with the canvas.
The BeginPlay event of the actor only need to set the view target of the controller to enable the camera and call to the previous function.
To manage the user touch event we are going to use the InputTouch node. While the mouse is pressed we need to calculate the mouse coordinates and transform it to the canvas coordinates. If the mouse is moved over a new pixel we can draw a dot using the call of the DrawingCanvas brush tool centered in the new pixel.
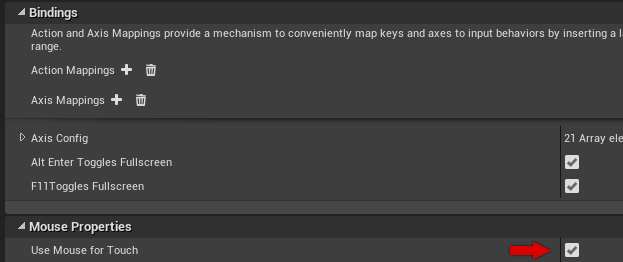
To be able to manage the touch event using a Desktop PC we need to enable the emulation of the touch event in Project Settings > Input > Use Mouse for Touch
Tutorial files
You may also like:
Support this blog!
For the past year we have been dedicating more of our time to the creation of tutorials, mainly about game development. If you think these posts have either helped or inspired you, please consider supporting this blog. Thank you so much for your contribution!

